


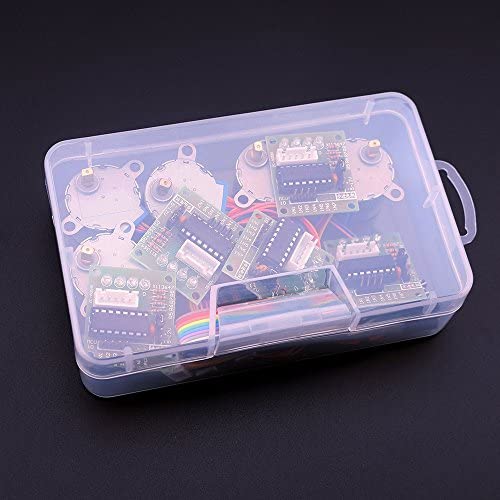

ELEGOO 5 Sets 28BYJ-48 ULN2003 5V Stepper Motor + ULN2003 Driver Board Compatible with Arduino
-

MK
Greater than one weekGreat motor, works well! I use it in my lab to move a translation stage, so it gets quite a bit of use. The motor runs hot, but a simple fan is sufficient to keep it running for multiple hours at a time. Would buy again!
-
MajorLeagueReloader
> 3 dayUpdate: Elegoo took care of the issue I had very thoroughly. Changed rating to 5 stars for excellent customer service. I will continue to make my purchases through them. [Original review] These little stepper & driver boards are GREAT for learning your way around programming. Arduino libraries are a little under gunned for these driver boards; accelstepper works much, much better. I suggest running at 6 volts or better, as under that I cant seem to get the little guys to really run. The boards are rated from 5-12VDC. Fried one in seconds at 10v (although the motor ran quite smoothly & with sufficient torque to actually use). No torque or speed really to speak of, but hey, theyre cheap. Good learning tool. Will contact Elegoo for a replacement.
-
Allen
> 3 dayI have no idea what these could be good for as they have no torque and they get smoking hot. I consider them junk.
-
Ben
> 3 dayOf the 5 ULN2003 boards, 4 had bad leds. One board had zero working leds.
-
Andrew D. Covey
> 3 dayHighly likeable. These work as expected. Dont expect a great deal of pep out of these; they are geared to provide torque more so than speed. At 12v, these get quite toasty, so Id recommend using 5v.
-
Bjrocket
> 3 dayGreat for what I needed! Easy 5o code on an Arduino and worked with my Arduino nanos too.
-
K Johnston
Greater than one weekThese are good, make sure you wire it correctly. Stepper myStepper(stepsPerRevolution, 8, 10, 9, 11); worked well for me. Basically swap the middle to pins and keep it to 17 rpms or below. Pretty Decent value.If you want to save space or use fewer micrcontrollers, you can run this guy with a NE555 and a CD4017 decade counter. A frequency of about 90 HZ on the 555 50% duty cycle works pretty well as a starting point. Update: use accelStepper configured in as AccelStepper::HALF4WIRE. Can get it up to a max speed of about 1000 pulse per sec as max speed
-
G.S.
> 3 dayWorked fine in testing. I havent used them for a project yet.
-
L. Wallace
13-06-2025I will be using these motors for self stirring cauldrons for a Harry Potter fair.
-
R. Becker
> 3 dayDelightful little motors. Operation is a simple walk: 1 foot down, 2 feet down, and so on like: | In 1 2 3 4 / In 1 2 3 4 | In 1 2 3 4 / In 1 2 3 4 | In 1 2 3 4 / In 1 2 3 4 | In 1 2 3 4 / In 1 2 3 4 Where a foot on a pin is a high voltage on that pin; its requires a bit more of the cpu than a direction_pin, step_pin setup, but I like the more direct understanding of the phase. Operation is very smooth with the 64x gear reduction even before trying microstepping. Planning to use this to motorize the stage of my labs microscope so we can automatically optimize alignment between its laser vibrometer and reflective targets.


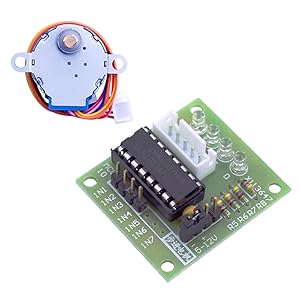
BYJ48 STEPPER MOTOR
Stepper Motor is a type of electromagnetic device which moves in discrete steps. This has several coils, the center shaft has a series of magnets mounted on it, and the coils surrounding the shaft are alternately given current or not, creating magnetic fields which repulse or attract the magnets on the shaft, causing the motor to rotate.
This Unipolar Stepper Motor 28-BYJ48 is provided with five wires and four coils. The center connections of the coils are tied together and usually used as the power connection. They are named unipolar steppers because power always comes in on this one pole.
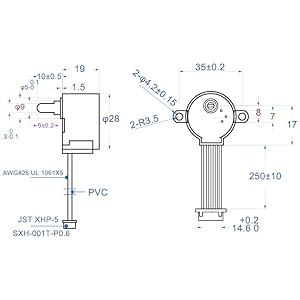
Specification
- A, B, C, D four-phase LED indicates the status of the stepper motor work.
- Stepper motor with a standard interface, when used directly pluggable.
- 5 line 4 phase can be used for ordinary ULN2003 chip driver, connect to the 2 phase , support the development board, with convenient use, direct docking.
- Rated Voltage: DC5V 4-phase
- Insulation Resistance: >10MΩ (500V)
- Dielectric Strength: 600V AC / 1mA / 1s
- Step angle: 5.625 x 1/64
- DC Resistance: 200Ω±7% (25C)
- Reduction ratio: 1/64
- Insulation Grade: A
- No-load Pull in Frequency: >600Hz
- No-load Pull out Frequency: >1000Hz
- Pull in Torque: >34.3mN.m(120Hz)
- Detent Torque: >34.3mN.m
- Temperature Rise: < 40K(120Hz)
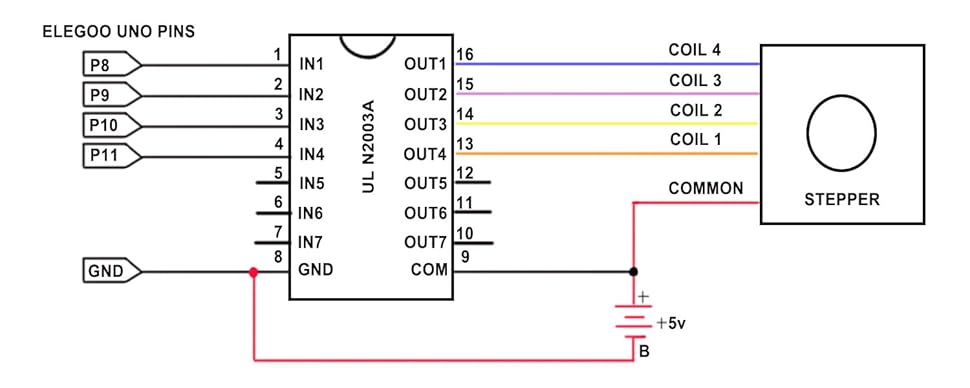

Programm Code Example
The Arduino IDE support a library for stepper motor, after connect motor with microcontroller you can upload the sketch on to the microcontroller. The following is the code of an example program, it can be modified according to your needs:
#define IN1 8
#define IN2 9
#define IN3 10
#define IN4 11
int Steps = 0;
boolean Direction = true;
void setup() {
Serial.begin(9600);
pinMode(IN1, OUTPUT);
pinMode(IN2, OUTPUT);
pinMode(IN3, OUTPUT);
pinMode(IN4, OUTPUT);
}
void loop() {
for(int i=0; i<4096; i++){
stepper(1);
delayMicroseconds(800);
}
Direction = !Direction;
}
void stepper(int xw) {
for (int x = 0; x < xw; x++) {
switch (Steps) {
case 0:
digitalWrite(IN1, LOW);
digitalWrite(IN2, LOW);
digitalWrite(IN3, LOW);
digitalWrite(IN4, HIGH);
break;
case 1:
digitalWrite(IN1, LOW);
digitalWrite(IN2, LOW);
digitalWrite(IN3, HIGH);
digitalWrite(IN4, HIGH);
break;
case 2:
digitalWrite(IN1, LOW);
digitalWrite(IN2, LOW);
digitalWrite(IN3, HIGH);
digitalWrite(IN4, LOW);
break;
case 3:
digitalWrite(IN1, LOW);
digitalWrite(IN2, HIGH);
digitalWrite(IN3, HIGH);
digitalWrite(IN4, LOW);
break;
case 4:
digitalWrite(IN1, LOW);
digitalWrite(IN2, HIGH);
digitalWrite(IN3, LOW);
digitalWrite(IN4, LOW);
break;
case 5:
digitalWrite(IN1, HIGH);
digitalWrite(IN2, HIGH);
digitalWrite(IN3, LOW);
digitalWrite(IN4, LOW);
break;
case 6:
digitalWrite(IN1, HIGH);
digitalWrite(IN2, LOW);
digitalWrite(IN3, LOW);
digitalWrite(IN4, LOW);
break;
case 7:
digitalWrite(IN1, HIGH);
digitalWrite(IN2, LOW);
digitalWrite(IN3, LOW);
digitalWrite(IN4, HIGH);
break;
default:
digitalWrite(IN1, LOW);
digitalWrite(IN2, LOW);
digitalWrite(IN3, LOW);
digitalWrite(IN4, LOW);
break;
}
SetDirection();
}
}
void SetDirection() {
if (Direction == 1) {
Steps++;
}
if (Direction == 0) {
Steps--;
}
if (Steps > 7) {
Steps = 0;
}
if (Steps < 0) {
Steps = 7;
}
}

|

|

|

|

|

|
|
|---|---|---|---|---|---|---|
| ELEGOO UNO R3 Board ATmega328P | ELEGOO UNO Project Super Starter Kit with Tutorial for Arduino | ELEGOO Mega 2560 Project The Most Complete Ultimate Starter Kit | ELEGOO UNO R3 Project Complete Starter Kit | ELEGOO UNO Project Smart Robot Car Kit V4 | ELEGOO Upgraded 37 in 1 Sensor Modules Kit with Tutorial | |
| Control Board | UNO R3 | UNO R3 | MEGA 2560 | UNO R3 | UNO R3 | / |
| Compatibility with Arduino | ✓ | ✓ | ✓ | ✓ | ✓ | ✓ |
| Projects Tutorial Included | ✓ | ✓ | ✓ | ✓ | ✓ | ✓ |
| Assembly Requirement | ✓ | No | No | No | ✓ | No |
| Reasons to Buy | The Same ATmega328 with Arduino UNO R3 Board; The Same ATmega16U2 with Arduino | Tutorial of 24 Projects, Cost-effetive Starter Kit | Tutorial of 33 Projects, Powerful Mega R3 Control Board | Tutorial of 33 Projects, Complete Stater Kit with UNO R3 | ELEGOO EleRobot APP; FPV Mode; Obstacle Avoidance; Line Tracking Mode | Tutorial of 34 Projects, Updated Version, Compatibility with Arduino IDE, Raspberry Pi and STM32 |