

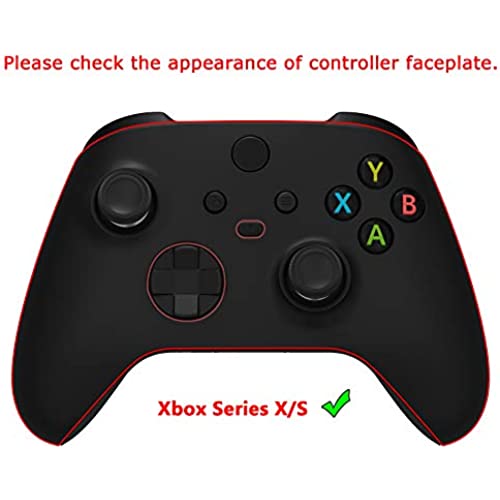

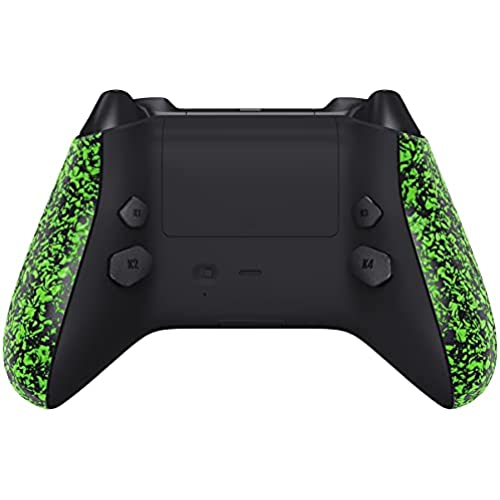


eXtremeRate Textured Green HOPE Programable Remap Kit for Xbox Series X/S Controller, Upgrade Boards & Redesigned Back Shell & Side Rails & Back Buttons for Xbox Core Controller
-

Tillbar
> 24 hourPRO: Elite was acting up. Bought a the cheapest solderinf iron on Amazon and this kit. (Just made sure to apply good amount of pressure when soldering through the holes) Got it first try and it’s been a month and they seem to still work. Cheapest Elite Controller. CON: It is a finger print magnet just like the Elite 2, and the I kind of don’t like the position of the K1 & K3 position since I only use K2 & K4 , but a personal problem.
-
Carlos Mejia
> 24 hourAs other reviews mention, after installing this kit, several keys do not work. In my case, not even the remapping worked. (Its easy to install, but note I have plenty of experience working with Electronics/Robotics and soldering) But the worst is the support given by the seller. To make the story short, after installing the kit (and then removing it), the controller (Brand new controller that came with my Xbox Series S) stopped working. Of course, installing this voids your warranty, but I still brought the controller and the kit to an authorized Microsoft Repair center for diagnostics, after troubleshooting, the technician found the kit had a Short circuit (They seem to dont do QA to their products), the issue caused the main logic board on the controller to die. The short circuit was between 2 points on different points of the flex board, but they problem was somewhere on the traces.. so it was a manufacturing issue, so this company probably never test their product before shipping After contacting the seller, with diagnostic and the issue found by a certified technician, they turn very hostile, and after requesting to be accountable for their issue, they stop replying. (Also note you can only contact them via Social Media, not even an official email, ticket system or Customer support, they reply to you every 2-3 days). I have already contacted Amazon to conduct an investigation on this seller.
-
C. Anderson
> 24 hourThis kit turned out great once completed. It probably took me an hour total to get it all put together, and that was partially because I also changed out the buttons and faceplate at the same time, and forgot to put a piece back that required nearly full disassembly again. The kit is well designed. All of the electronic pieces are laid out so they kind of self-align where they need to go. Following the video online, it was a pretty easy job, though some of the solder joints are very small and close together. Take your time and pay attention to the directions and it will work fine. I also ended up taking the advice I saw from another reviewer where I had an LED test board that was falsely telling me one of the joints was bad. If that happens to you, use the board to diagnose which point, and just make sure it has a solid solder joint and then move on. Id have spent a lot more time trying to diagnose something that wasnt bad if I hadnt read that other reviewer with the same problem. Once put together, the kit works great. I love being able to re-map buttons on the fly, though I do wish it had a memory with maybe 2 or 3 profiles to switch between for different games. But I have no complaints for the price and function. Im very impressed with both this kit and the same companys controller shells and could easily see myself buying more of them to customize my other controllers in the future.
-
Art
> 24 hourI purchased this after my scuff prestige paddles broke for the 5th time, and I could no longer purchase replacement paddles online. The price seemed like a no brainer as I could do the soldering work, and had old controllers lying around. If you dont know how to solder this isnt for you, but if you do, or are willing to learn, its worth it. As for the installation, it was easy and straight forward. The one complaint I had was that I think there must have been an issue with my test board. When I finished I only had 2 lights come on, however after rechecking multiple times my solder joints were secure, so I said forget it Im testing the controller and put it all together. Low and behold every feature works fine. It was a frustrating point that it had me chasing ghost to try to figure out what the problem was, but the satisfaction of being able to say you did it yourself outweighs any of it. As far as use goes, the controller itself is very slick. It gets slippery when picking up and setting down the controller repeatedly (ie watching YouTube, twitch, etc), however when you are gaming you dont notice any issues. Can always just use a random casual controller when doing casual things. This isnt a big issue however, must nitpicking every possible thing I could think a downside would be. If this was a concern I would say buy the textured one? The buttons feel very clicky and responsive. I love the feel of them. They are much nicer to use then any paddles Ive tested. Ive got pretty big hands, and have no issue with button positioning and being able to use them all without compromise. Another big plus about the feel, which I initially worried might had been a thing, was the fitment. Alot of aftermarket diy kits, as in many fields, have an issue with fitment being seamless. This is just that though. I have no issues with seams or loose pieces. The build quality is top notch as well. All in all a great product that I enjoy using more than my past scuff controller or elites.
-
K&B-PA
> 24 hourVery easy! Definitely recommend.
-
Elijah Roush
> 24 hourAt best, Im a novice at soldering. My experience is limited to very basic wire on wire stuff maybe 4-5 times in my life. I have the cheap Amazon recommended soldering pen kit and a steady hand. This was pretty easy. It took around 2 hours and a couple moments of frustration but when I was done, I had perfect solder beads and solid points. When I tried the tester, every light illuminated flawlessly and when I tested my controller in a gamepad testing program, it worked flawlessly. HOWEVER, WATCH TUTORIALS. If you watch the companys official tutorial, check the comments first. They tell you to use the wrong screws early on and correct it in the comments. If you use these screws for the button brackets, they will push out little bumps of the plastic on the back of the controller when tightened because theyre longer than the screws youre intended to use. Other than that, I recommend using flux or at least flux core solder for a MUCH easier install. My strategy was actually cutting little bits of solder, using tweezers to position them on the circuitry test points and get a nice bead formed, then hold it down with tweezers onto the board TP and solder it to the board. My solder didnt want to bead and separate and instead just beaded up onto the wire instead of coming off onto the solder points on the circuitry. (Probably because I was using a super fine soldering tip). So cutting it with a razor and tweezering the perfect amount of solder onto the points was easier and resulted in perfect solder beads, for me at least. Just dont use too much solder, it truly doesnt take much. All in all, this was incredibly fun to do and in my opinion, totally worth it if youre at least sort of experienced with soldering. I just wish I had pictures from midway through or after soldering because I was very proud of my soldering job.
-
JIN
> 24 hourDifficult to install. I originally had given it a 1 star, but after tricking n soldering wires on n off, n a few more breaking off along the way, I was finally able to make this controller with the help of my bro. After making this wrk, it was a great feeling n accomplishment. Superb controller with great the features. Love this controller now!
-
Guilherme
> 24 hourEasier install, havent soldered anything in years and it was straightforward with the youtube tutorial. Perforsm as adversities buttons are chunkier than I tough but still Works well.
-
Big Daddy
> 24 hourIt broke my controller during the installation. Video instructions not clear.
-
Arron V
> 24 hourSo I was nervous about trying to do this but figured why not. My Elite Series 2 stopped working properly and everything else is sold out everywhere. So I made my own pro controller. I used Extremerate products for the whole build and couldn’t be happier. I’ve never soldered before so if I could figure it out in one try I’m sure most people can. Plenty of videos on YouTube to show you how to do it. Great product.


|
|
|
|
|---|---|---|
Prepared for e-Sport Tournaments
|
|
NOTICE
|


Installation Tips
- Installation difficulty: high
- Patience needed: high
- Please view the installation video carefully before installation.
- Get the installation video guide on YouTube by searching “eXtremeRate Hope Remap Kit for Xbox Series X/S Controller" or "XKlgY1SZQBs".
- If you have any problems during the installation process, please feel free to send us a message.
- The FPC board needs to be soldered and the FPC board should be fixed with double-sided tape before soldering.
- When soldering, please be careful not to pull the Hope-FPC cable, the soldering time of each TP point is less than 1 second.
- After soldering, it can be tested with the test board.
- If all the LEDs on the tester board are not lit, please check P2 and TP35 solder points whether soldering correctly.
- If only some of the LEDs are not lit, please check the corresponding solder points whether soldering correctly.

- Turn the toggle switch to the right, the blue light will be on and then enter buttons programming mode.
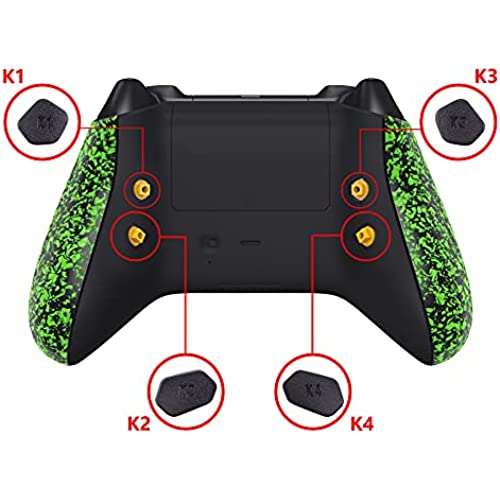
- You can activate the remap program during the game and assign a maximum of 14 buttons (A, B, X, Y, L3, R3, LT, RT, LB, RB, Up, Down, Left and Right ) to the back buttons.

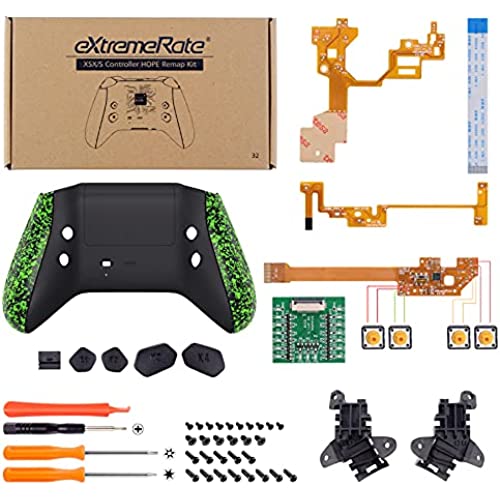
Package Includes
- 1* Hope remap board
- 1* Hope tester board
- 1* Hope cable FPC1 & FPC2 & FPC3
- 1* Redesigned back shell with battery cover
- 1* Left/Right side rails
- 4* Back buttons
- 1* Prying tool
- 1* T8h & T6 & Cross screwdriver
- 29* Screws
- Note: The controller and other parts are not included.


