

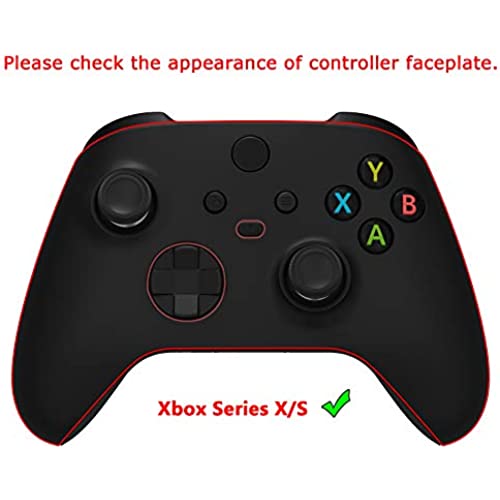

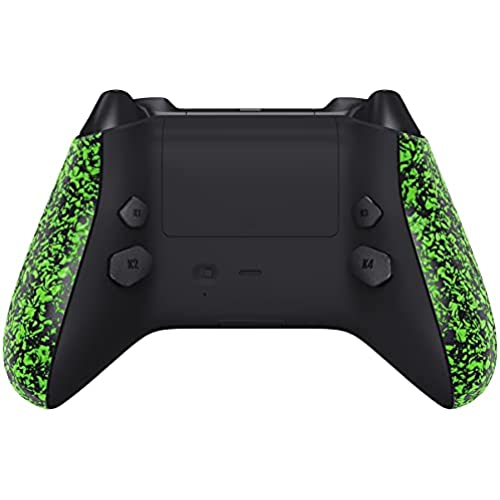


eXtremeRate Textured Green HOPE Programable Remap Kit for Xbox Series X/S Controller, Upgrade Boards & Redesigned Back Shell & Side Rails & Back Buttons for Xbox Core Controller
-

Guilherme
> 24 hourEasier install, havent soldered anything in years and it was straightforward with the youtube tutorial. Perforsm as adversities buttons are chunkier than I tough but still Works well.
-
Adam
> 24 hourUsed the test board after soldering and it would only light up 5-6 of them. So I resoldered the other points twice and tested it again and none of them lit up. When I pressed a soldered point, that point would light up. Im guessing the test board was faulty because after I assembled it, I was able to remap the sticks and the face buttons just fine. I really like the mod and theyre not as loud as the ps4 remap kit and shell from extremerate. Those were really loud. This mod would be better if the k3 and k4 buttons were as small as the top buttons. I removed the bottom ones as I like gripping it tightly and the bigger buttons got in the way. Also the back is a downgrade compared to the textured back on the original which gave more grip. I really dislike the soft shell as hand oils will go on them overtime and cause the color to fade
-
K&B-PA
> 24 hourVery easy! Definitely recommend.
-
dc
> 24 hourSome of the kit parts are easy to install and the soldiering wasnt to bad but the quality of those lofty fpc2 melted as soon as I touched the soldering iron to it. I had 1 soldier connection that I never could get it to connect. So I just taped it down and put the controller back together and it works great. Hopefully will stay working. And yes I took a couple soldiering courses and got a certificate for a soldering technician so I know how to solder.
-
Tillbar
> 24 hourPRO: Elite was acting up. Bought a the cheapest solderinf iron on Amazon and this kit. (Just made sure to apply good amount of pressure when soldering through the holes) Got it first try and it’s been a month and they seem to still work. Cheapest Elite Controller. CON: It is a finger print magnet just like the Elite 2, and the I kind of don’t like the position of the K1 & K3 position since I only use K2 & K4 , but a personal problem.
-
Scotty Kauffman
> 24 hourHad trouble at first but works great now…Installer error. The first time I Soldered, all of led’s on the test board lit up, indicating that all solder points were good. After putting it back together and using the controller, my R3 wasn’t mapping. So I took it back apart and retested it, and sure enough R3 and TP 15 we’re not lit up on the test board. So if anything isn’t mapping retest and fix solder points.
-
Dra6onfire
> 24 hourThis is a very reasonably priced mod and it works really well. All of the parts are well made and the youtube guide video is clear and well thought out. Extremerate has excellent customer service. I wouldnt not recommend this as your first soldering attempt, but if you have some experience with soldering, its a great kit
-
Elijah Roush
> 24 hourAt best, Im a novice at soldering. My experience is limited to very basic wire on wire stuff maybe 4-5 times in my life. I have the cheap Amazon recommended soldering pen kit and a steady hand. This was pretty easy. It took around 2 hours and a couple moments of frustration but when I was done, I had perfect solder beads and solid points. When I tried the tester, every light illuminated flawlessly and when I tested my controller in a gamepad testing program, it worked flawlessly. HOWEVER, WATCH TUTORIALS. If you watch the companys official tutorial, check the comments first. They tell you to use the wrong screws early on and correct it in the comments. If you use these screws for the button brackets, they will push out little bumps of the plastic on the back of the controller when tightened because theyre longer than the screws youre intended to use. Other than that, I recommend using flux or at least flux core solder for a MUCH easier install. My strategy was actually cutting little bits of solder, using tweezers to position them on the circuitry test points and get a nice bead formed, then hold it down with tweezers onto the board TP and solder it to the board. My solder didnt want to bead and separate and instead just beaded up onto the wire instead of coming off onto the solder points on the circuitry. (Probably because I was using a super fine soldering tip). So cutting it with a razor and tweezering the perfect amount of solder onto the points was easier and resulted in perfect solder beads, for me at least. Just dont use too much solder, it truly doesnt take much. All in all, this was incredibly fun to do and in my opinion, totally worth it if youre at least sort of experienced with soldering. I just wish I had pictures from midway through or after soldering because I was very proud of my soldering job.
-
tj_M
> 24 hourSadly my controller started triple tapping buttons when the mod was installed. So, I had to remove it. After having this installed and then having to remove it, I can say I cant see playing some games w/o it. I have zero plans to risk buying another one currently till I can address the failure point. Im leaving my first review intact but would like to make a note. *The removal was easier than expected but I recommend using proper pry tools and a low temp setting on your heat mat/gun to soften the adhesive and make it come off w/o damaging the tfp/ribbon connectors. My First Review is below. PROS Great upgrade! CONS Can make future controller repairs considerably more difficult. Super easy to figure out. I was able to install it w/o even needing to look up directions online. If work on Cellphones or Macs running traces and dealing with multiple screw sizes all over isnt a big deal. (This is way easier) Build time is about 20 Minutes. Its plastics designed very well, but not the best quality of plastics. -Might become a bit brittle and crack near stress points over time. So, dont over tighten those screws. My main gripe is with how its is made to be permanent. It makes future service of the controller way more difficult than it should be. Like if it develops drift for example. A simple redesign of the flex-board could eliminate this by moving the w2w to the center and run it up between the wireless ants. It might have room to use a single ribbon this way. (would loose the Tester feature) But that way the tape wouldnt need removed should you ever need to replace your joys. or button caps. The price of this kit + a controller is close to that of a refurbished elite controller or even more than a used first gen elite controller. It never hurts to think about serviceability. Anyways Great product if you already have a spare controller laying about. It might be worth the extra few bucks to get an actual elite series as they are fully serviceable and can be exchanged for new ones while under warranty should they break.
-
Jesse
> 24 hourLove this remap kit it’s affordable and with some basic soldering skills you can have a pretty nice modded controller. It’s definitely helped with my gaming movement being a lot faster once I got used to it.


|
|
|
|
|---|---|---|
Prepared for e-Sport Tournaments
|
|
NOTICE
|


Installation Tips
- Installation difficulty: high
- Patience needed: high
- Please view the installation video carefully before installation.
- Get the installation video guide on YouTube by searching “eXtremeRate Hope Remap Kit for Xbox Series X/S Controller" or "XKlgY1SZQBs".
- If you have any problems during the installation process, please feel free to send us a message.
- The FPC board needs to be soldered and the FPC board should be fixed with double-sided tape before soldering.
- When soldering, please be careful not to pull the Hope-FPC cable, the soldering time of each TP point is less than 1 second.
- After soldering, it can be tested with the test board.
- If all the LEDs on the tester board are not lit, please check P2 and TP35 solder points whether soldering correctly.
- If only some of the LEDs are not lit, please check the corresponding solder points whether soldering correctly.

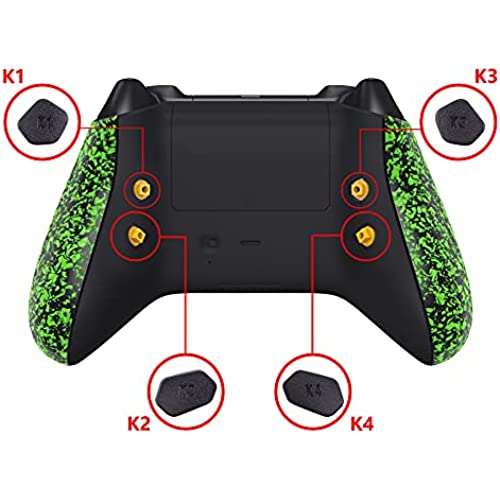
- Turn the toggle switch to the right, the blue light will be on and then enter buttons programming mode.
- You can activate the remap program during the game and assign a maximum of 14 buttons (A, B, X, Y, L3, R3, LT, RT, LB, RB, Up, Down, Left and Right ) to the back buttons.

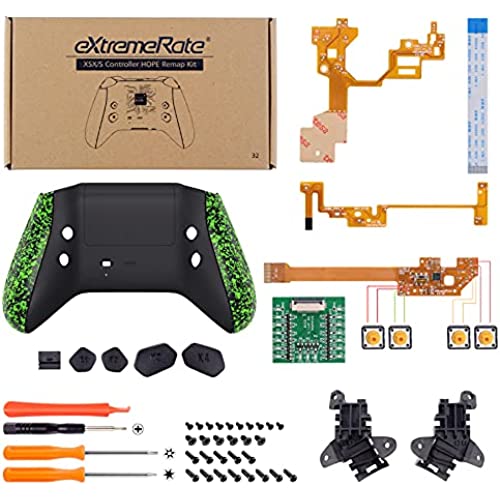
Package Includes
- 1* Hope remap board
- 1* Hope tester board
- 1* Hope cable FPC1 & FPC2 & FPC3
- 1* Redesigned back shell with battery cover
- 1* Left/Right side rails
- 4* Back buttons
- 1* Prying tool
- 1* T8h & T6 & Cross screwdriver
- 29* Screws
- Note: The controller and other parts are not included.


