
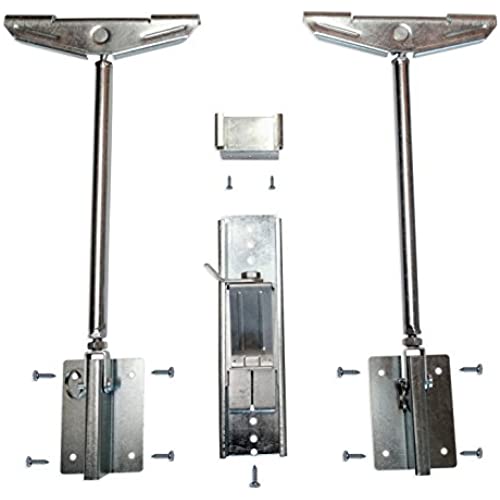


Never Fall Complete Sink Repair system
-

LA Sulz
> 24 hourI was quite worried about cracking of granite to repair, but liked the idea of these 2 screws that you tighten manually to help avoid this. Had a friend who is quite handy who was able to complete the job in under 2 hours. Wasnt much room in front to put the middle brace, however. The other issue was once they were in place, the back still had a gap, so used the galvanized wire straps that had been used during the initial sink installation and this seemed to do the trick. I think this is similar to what others have said that perhaps you need 2 sets (2 each side) versus just one. . . or maybe you have to be VERY good at placing exactly in the middle of the sides of sink AND ensuring level when they meet the underside of the sink which was stressed in the install information. Also felt the price was reasonable in USD as Canadian website was much more expensive for same product.
-
Scott A Akey
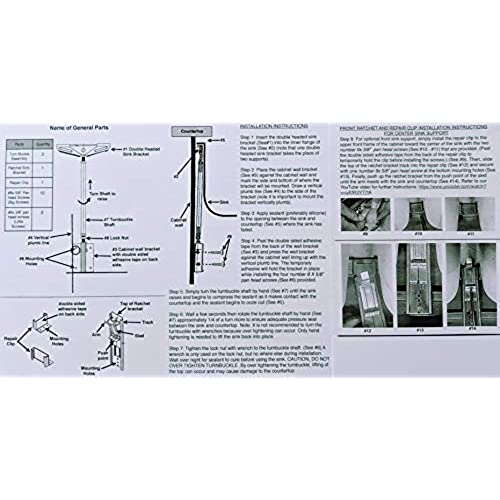
> 24 hourWoke up on a Sunday morning to find my sink had lost its hold and fell. Being somewhat handy, I had a clue on how to fix it but the thought of chipping away all the old epoxy and re-epoxying the sink was not something I really wanted to do. I had no room to add a support that made a lot of sense. Off to Amazon I went and I am so glad I did! Whoever invented this system is a genius! It is very simple to use, straightforward directions and gave options depending on how the sink is attached. I had to change the general use as my sink would not work with as directed in the instructions, but it worked flawlessly. I could not be more happy and am thankful I did not need to buy a new vanity or re-epoxy the sink.
-
Josh and Melanie S
> 24 hourMy sink collapsed right before the holidays and I needed a quick way to get it back in place. I found this on Amazon, got it in two days and installed right away. Easy to follow instructions and very sturdy. Definitely a worthwhile purchase. Took me about 20 minutes to complete the job
-
Rebecca
> 24 hourThis is a wonderful product, something I wish granite installers would put on (even at an add-on installation price) when the sink is first set into the granite. (Original install was with cardboard & silicone glue :0(. Our double sink (with same sized bowls on either side) had dropped & husband had supported it with a couple of 1X4s front & back. It was so dropped upon their removal that is was necessary to remove the sink, remove the silicone from the sink & the granite. It was a bit difficult for hubby to get into the cabinet to put the brackets in place, but he did it. Everything now looks brand new. This Never Fall system is so good that we bought a set for our secondary kitchen sink & a set for our son-in-law to install at his house.
-
Ron West
> 24 hourInstalled in about 30 minutes
-
Fedupintx
> 24 hourI really liked this product for the way I used it. My undermount stainless steel sink detached from the granite countertop as it had not been originally installed with any kind of clips or brackets to help hold it up, only the silicone adhesive/caulk. I was completely worried about trying to find a granite fabricator to drill and install clips when I found this product. Although the instructions discuss using this to lift the sink into place, I did not try to use it for the actual installation. I just did not see a good way to get the sink almost in place and still have enough room to lay the caulk bead before raising it all the way to mount it. So I used a board spanning the sink cut out above, with bar clamps placed in the drain holes to pull the sink up. This gave a slightly uneven pull since the drains were off center toward the back, so I used a small (bottle) car jack underneath to lift up the sink and caulk it into place. Once the sink was secured with the clamps and jack and it appeared to be exactly where I wanted it, I installed the Never Fail brackets to lock it in place. I had room to get one side done while the caulk was drying, but since the jack was in the way, I just waited to get the other side done the following day after the caulk had set. No big deal since the clamps and jack were keeping it in place. The long side brackets were super easy to install and reached well below the bottom of my sink so I had plenty of room to drive the screws without the sink being in the way. I would recommend you install the bracket for the small front slide lock before you put the sink in place. I managed to put it in, but it took some tricky, off center placement and a ratcheting right angle screwdriver. For how I used it, this was just the ticket....
-
Tom
> 24 hourThe undermount sink in my kitchen became detached from the countertop. It sunk down and, in turn, was causing an issue with the pipes since they were sized to fit from the original position. Im not that handy of a guy, so got immediate anxiety about who Im going to need to call and how much. Did some internet searching and found this product for a very reasonable price. I figured it was worth the try. From opening the package to having it installed...took under an hour. Its been in place now for a few months and Ive had zero issues. I deviated from the instructions a little regarding where to install the arms (front & back vs on the sides, etc.), so keep that in mind if you feel another spot would be better. But this thing was a lifesaver and I highly recommend.
-
Alex Gindin
> 24 hourOur under the counter (double) stainless steel sink was installed poorly when the new counter tops went in (prior to us buying the house), and was being held up by one small, cheap metal bracket - basically the sink was falling down. I had no idea about attaching sinks to counters, and decided to try this product out before calling in help. It was super easy to install (about 10 minutes), and even easier to adjust. The sink is pretty heavy, but turning the supports to raise it was completely effortless. I did end up using the optional ratchet on the front of the sink because the sink was still bowing, and that worked perfectly as well. Highly recommend. It took up almost no space in the cabinet under the sink. Remember to use sealant between sink and counter.
-
Chuck Arrington
> 24 hourA must if replacing an undermounted heavy sink.
-
J. Busse
> 24 hourStarted the install at 7:15 and was complete with a new no clog drain assembly by 8:00. I did not use the front bracket. It might have been faster with 2 people. I used a chisel to remove the old glue that had hardened. That took most of the time. There is about one inch of adjustment in the extension so I just dry fit everything and marked the cabinet walls about 1/4 - 1/2 inch below where the shortest distance of the extension landed. I did take out the pin and extension first and stuck only the bracket to the wall using the double sided tape so all that weight wasnt hanging on the glue. I was able to drill the pilot holes, that I think are very important, with a 90 degree drill. I could not fit my electric driver under the sink so I had to use a 90 degree ratcheting phillips to drive the screws. Needless to say, it is important to have the tools on hand and plan well. Then I put the sink on a stack of pots, put some sealant around the lip and installed these brackets. Then I hand turned the extensions slowly as the sink squeezed out the excess gunk. Turn wait, Wait Turn Turn Wait... etc. Done with the install. I did take the opportunity to install one of the no clog stopper assembly available on Amazon or the local hardware store. It works great too. Even though this is fairly expensive compared to clips I think it is well worth the money. It is darn near fool proof, is very strong, and easy to install.