
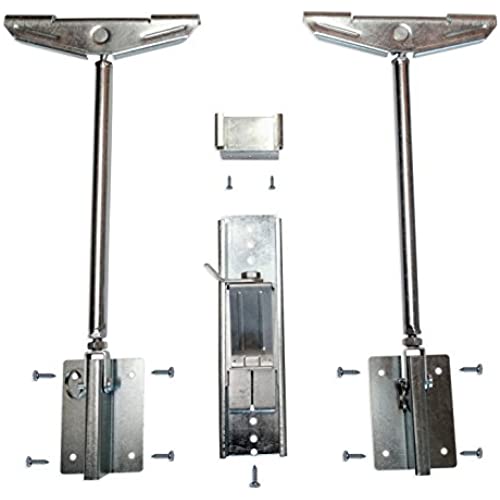


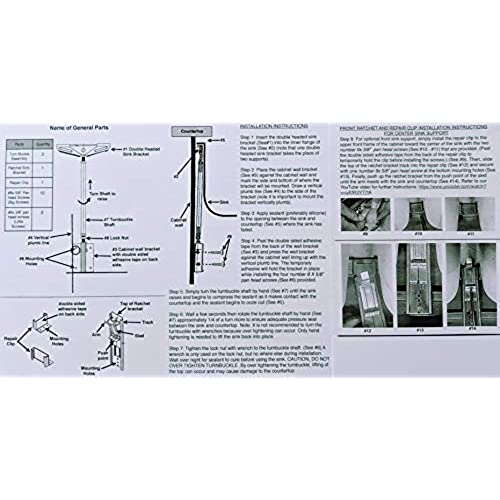
Never Fall Complete Sink Repair system
-

Eric I.
> 3 dayI really cant believe that the original undermount sink was installed in my house with shims and glue holding it up. Three of the four glued on shims had failed and my sink was sagging on two sides. Attaching these made it look better than new again! Dont forget to get the correct silicone caulk for stainless steel sinks. Put the caulk in first and then tighten these up for a great seal as well as a great look!
-
Handsome Stranger
12-06-2025Under granite sinks are poorly supported. At least the ones I seen. The sink in my daughters Kitchen came loose and developed an uneven gap around the entire sink. I did a quick search on YouTube for ideas and saw this. Perfect! It is incredibly easy to install. I anchored one of the Never Fall telescoping rods to each side of the sink before doing anything else. I cleaned off the old silicone between the granite and the sink, added new adhesive to the sink, and began to hand tighten the Never Fall telescoping rods until I met resistance. Then I tightened each side a little at a time until the sink was accurately in place with no gaps. The next thing I did was tighten the jam nuts on the Never Fall telescoping rods. The last thing was to add clear silicone to the lip of the sink and granite. All of this took less than an hour. I would recommend for an easy way to make quick work of an under granite sink repair.
-
Rick Salve
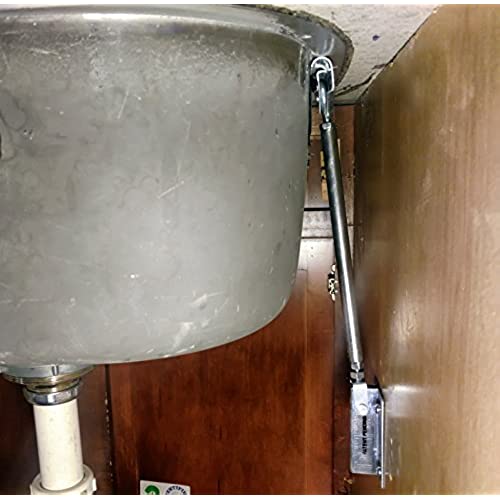
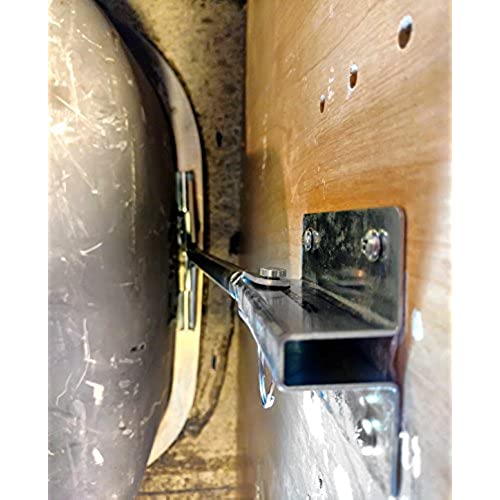
> 3 dayMy sink collapsed from the weight of a bowl of water!? Didn’t know that was possible. Suspended by epoxy resin from the granite countertop, I was actually shocked that it didn’t happen sooner once I saw what was holding it up: essentially a couple beads of epoxy resin. Following my tradition of overstructuring anything I DIY, I installed 2 on each side of the sink. That also provided me the maximum flexibility of being able to support the sink from asymmetric points. Otherwise, I would have take all of the plumbing out, including the garbage disposal and the water filtering system, just to get a clean access. If you are like me, and would rather lift everything as the video describes, your biggest challenge will be to drill the supporting screws before tightening the turnbuckles and restoring all of the sink and hookups to its prior position. BTW, that actually works. I was skeptical. For that reason the adhesive backing feature is a God send, since it supports the brackets before you can get the screws in. Get it level as possible once you stick it into position. As far as screwing the brackets to the side of the cabinet walls, one should use a flexible drill bit. There just isn’t any room under there. Despite the flexible drill bit, I still had to install half of screws blind or by feel. To that end, I recommend drilling pilot holes first, then the screws. It’s so much easier since drilling at bend will reduce the force you can apply. If you’re unsure where to put the brackets, just tighten the turnbuckle when you open the package just to see what the maximum lift distance is, and you’ll get a feel for what you have to work with. Account for the fact that brackets will support the sink at angles. The turnbuckle only will give you about 3 inches or so to lift the sink. Position the sink first. To achieve this, I just propped the sink up with a bucket and a couple pieces of wood from the bottom of the garbage disposal until about a 2-3 inch clearance existed between the bottom of the countertop and the top of the sink. Attaching the brackets with the screws is the most time consuming part, otherwise everything went as planned or as the video shows. The next most time-consuming part is removing the previous calk to create new clean surface to calk. Calk and then lift the sink as evenly as possible by turning each of turnbuckles counterclockwise until the sink and it’s attachments are back into position. Weird as it seems, the plumbing will actually help, since it “wants” to be in its previous position. Given these caveats, the product works great and is an improvement over what was there. I’m pretty sure I can stand in the sink if it we’re not for fear of denting the stainless steel.
-
Julia Schoen
> 3 dayEasy to install. Much better than alternative to raising sink. Glad I found this product.
-
~*~ Sunshine ~*~
> 3 dayWe just installed these on our under-mounted, stainless steel, double kitchen sink yesterday and I am impressed. Our home is 12 years old and the sink has been dropping in front for some time now. We tried tightening the existing clips but it didnt last, which brought me to research solutions when I found these. Before fixing it, there was a 3/8-1/2 inch gap in the front of the sink, for reference. Im not sure of the limits of the brackets, but they were able to close our gap. Our sink was mounted with 4 clips held up with screws that are placed in slots milled into the underside of the granite countertop, and a glue/sealer between the sink and granite. This may have been adequate if not for a garbage disposal and the fact that the cabinet has a little hinged utility drawer in front of the sink making it impossible to support it in that entire area. That noted, we couldnt use the center mount that was included with this kit either, but the two side supports seem to be doing a great job by themselves. These parts are very sturdy and made well, IMHO. I was impressed with the weight and heft when I unpacked them. There is peel and stick glue-tape on the mounting brackets to hold them to the cabinet wall after you place them and before you screw them in, which is a huge help in installation. Its still a task with many frustrations, mainly from lack of accessibility under a sink with existing pipes and a garbage disposal, but we managed to mount them and tighten everything together after the caulk/sealer was applied. Hooray! It looks like a successful project completed! Fortunately, our double sink was a tight fit in the cabinet and the walls were close to the edges so the angle for mounting these was pretty ideal. We were able to fit the braces between the original clips and tighten them up as well so, hopefully, the combination will be adequate to support the weight even without the front sink support. There are other options that Ive seen in my research, if needed, that could be added, like a brace under the disposal or sink basins. I will update my review if there are any changes or failures with this kit. I would strongly recommend it at this point and, if youre a DIY-type person, that you would be able to install it yourself. Otherwise, Id advise a handymans assistance. 5 stars at this point!
-
Nate
> 3 dayWhen the builder only glued in the sink and it detached from the underside of the granite, I didn’t think there was any way that fixing it could be easy. It turns out, this product vastly exceeded my expectations! This made reinstalling the sink quick, simple, and made it a one-person job. I’m already recommending this product to friends and family with undermount sinks. In fact, when we moved into a new home, I ordered another one of these right away to take care of the problem preemptively. Great product both times!
-
Helper
> 3 dayAn innovative product from an inventor. It will help any handyman homeowner fix a fallen sink in matter of hours. Our builders plumber did a shotty job by using Epoxy and wood shims pressed against sink lip and granite. I learnt later that this is a common practice for under-mounted sinks on Granite or Quartz. Positives: Easy to install once sink is held in place using sink setters. Slide and lock mount is very handy to support in the front. Cons: The double sided adhesive cannot hold the weight of the bracket.... needs further development Recommendations: The set should include second Slide and Lock for balanced support or seller should create separate set with for larger sinks with 2 Slide and lock mounts. This is highly recommended for offset 2 bowl sinks like mine. I had to buy second set from granite fabricator supplies seller GrandQuartz.com. Seller needs to caution the buyers or installers not to over tighten the mounts as it would start pushing the granite up away from the cabinet or break the joint.
-
Pepin Torres
> 3 dayI had a sink fall (from a granite countertop) when the brackets gave out. I had one person come in to fix it twice, and twice it fell (originally, he charged me $300 which was reimbursed after much complaining on my part). Two more contractors basically told me there is nothing they could do about it and refused to come in to check it out. I then went to the web and found this product. WORKS AS ADVERTISED. It takes less than 30 minutes to install and the installation process is made real easy with the adhesive tape (I do recommend you watch the YouTube video). The only tricky part is applying the recommended clear silicone sealant but is you practice your caulking skills on something else before committing to the sink, youll be fine. Do follow the instructions about hand tightening - dont be tempted to use a wrench. I had no need for the optional front bracket but saved it just in case. If you have a fallen sink, get this. Youll get a permanent solution at a fraction of the cost.
-
J. Poulos
> 3 dayHad undermount sink fall down - tried the glue on mounts they fell- these worked awesome - now the sink isnt going anywhere
-
EricEFNY
> 3 dayThe sturdiest installation hardware for new or replacement sinks in the kitchen or bathroom. No drilling into ceramic, marble or any type of countertop. Mounts to the side wall of of the base cabinet. Less obstruction of the cabinet storage space as opposed to those mounted to the bottom of the cabinet. Easy installation...great product!


